
Schnitzel Gets a New Black Coat (cont.)
Restoring the pan
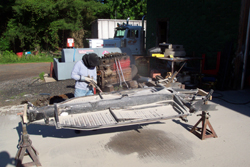
The pan was hauled over to the shop where my husband works on the weekend to be blasted and painted. Here you can see it fits nicely in the bed of the pickup truck. Attached are our special made supports that allow the pan to be pivoted anyway we like while blasting it. With a hot sun and damp sand we started out at 7 am and didn't finish until 9 pm. I blasted, my husband swept up the sand, we both sifted it and stuffed it back in the blaster cylinder over and over again. We could barely move the next day. Sweeping up the sand, sifting it and blasting it takes a long time and a lot of muscles we weren't familiar with. You can see the special made supports just rest on two jackstands and allow the pan to be spun around 360 degrees while working on it.
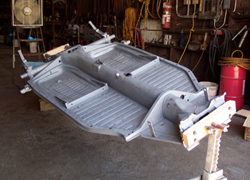
Only a couple very tiny pin holes showed up in the battery tray, the rest of the pan is solid but dented. None of the dents were removed, Schnitzel will keep his battle wounds from the past years on the road. He's earned them.
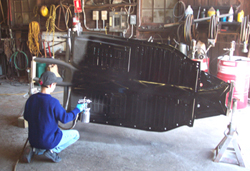
Here I am spraying the pan with POR-15 in the photo on the right. The pan turned out very well, since this is a self-leveling paint it comes out nice and smooth no matter how bad a painter you are. Painting didn't take long at all, the first coat was done in less than 30 minutes. Four hours later we returned to put the second coat on. This paint is very tough and almost impossible to chip or scratch off. Since Schnitzel will be driven daily from April to November still we chose to use this paint over an original paint.
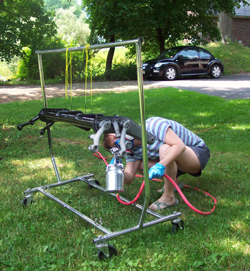 Painting the front beam had actually started much earlier than the pan, but wasn't actually completed until later. I originally had degreased the beam and used stripper on it to remove the remaining paint and then brush painted it with POR-15. About 500 little bugs found the beam in the garage and landed in it before it dried. It looked so bad that I ended up sandblasting it over 3 weekends (POR-15 is VERY tough to get back off) and repainted it with the spray gun. It turned out much better, the bugs didn't find it this time.
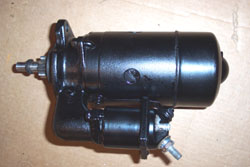
Another piece ready to go on the finished pan is my original starter. Never replaced, never altered, complete with screw terminals, all I had to do was repaint it.
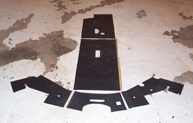
I saved the original pieces of sound deadner from my pan, made a paper pattern from them for now and future use and cut out new pieces. I actually didn't use the two outer pieces in the rear. I liked the way the pan looked with out them, so I just stuck with the 3 center pieces.
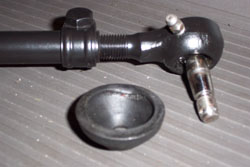
My Beetle had all original tie rods and ends on it in perfect condition. I repainted them and prepared to install them after my rebuilt steerbox went on and found the threads to be damaged badly on the passenger outer end. After trying to fix it, I bought a replacement end. Then figuring I had nothing left to lose, gound off the bottom 1/8" of threads off the end to try a last minute save. It worked! I managed to keep all original tie rods and ends on my Beetle. There are 12 locations for grease on the front beam as original now: 4 grease fittings on the tie rods, 4 on the beam and 4 on the king pins. The steering box is an original rebuilt box with all new seals and paint. I've also installed a new coupler and reused the original ground strap.
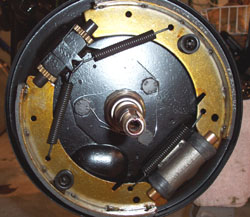
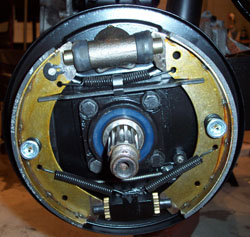
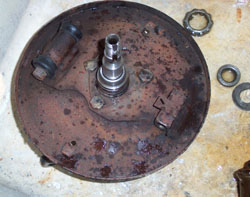 Here is a nice shot of a backing plate for the front brakes as it looked when first removed from Schnitzel. To the right is the plate repainted, mounted and all new brake parts. All the original hardware, springs and clips were cleaned and painted satin black, new German wheel cylinders and new shoes were installed.
The rear brakes were a bit trickier since they have the emergency brake lever on them. In this set up the lever actually sits behind the shoes and you cannot see it very well in the picture. Again original hardware was saved and repainted, new German wheel cylinders, new brake shoes were installed. Also installed were new axle seals, and axle boots.
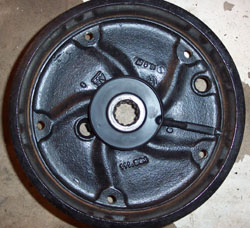 The inside of all drums were cleaned and painted with POR-15 semi-gloss paint. Here you see a rear drum with the oil slinger installed. That's the date stamp in the upper right of the picture. Remember date stamps in a VW read by European standard of day-month-year not month-day-year as the American standard.